4 Easy Way to Disable Automatic Windows Updates in Windows 10 Permanently
There are
many variations of Windows, starting from Windows XP, Windows Vista, Windows 7,
Windows 8, and the latest version is Windows 10. And every Windows always has
an update feature to improve the performance of the Windows system itself. But
in the latest Windows series, Windows 10 always installs system updates automatically,
even without our permission. And every time Windows update is in progress,
sometimes it has an impact on our computer's performance. Like computer
performance which is become slower, some even interfere with the internet
network that to be slow. That's way a tutorial about
Of course
this is quite detrimental to us, if we are working on our tasks on a computer,
then our computer becomes slow, we can not complete the task on time because
the computer performance suddenly turn to be slow. But there are several ways
to solve this problem. You can use these steps to stop this windows update and
you can decide when you want to install the update.
In Windows 10,
this system update is no longer optional, but it is mandatory. It means that if
there is a windows update, our computer will automatically download the update
data and install it immediately as soon as it is ready. Even though this new
method is an easy approach to ensure that each device has bug fixes, security
patches, and the latest enhancements, it's not an option that everyone would likes.
Windows 10
itself has several editions, such as Windows 10 Home and Windows 10
Professional. If you have a computer that uses Windows 10, there is an edition
of Windows 10 which is still possible to regain some control and stop the
automatic updates of windows using the Local Group Policy Editor or Registry. In
this article about Windows 10, numbones.com will guide you about how to turn off automatic updates windows 10 from installing on your device.
Related : 9 Best Christmas and New Year Vacation Spots for Families
How to Turn Off Windows 10 Update Permanently
How To Block Automatic Windows Updates Using Local Group Policy
If you use
the Proffesional edition of Windows 10, you can use the windows update group policy windows 10 to change the settings of the Windows system. Then we will use using
this Local Group Policy Editor to prevent your device from downloading and
installing Windows updates automatically. Here's Windows 10 Home Disable Automatic Updates Using Local Group Policy:
After you complete the above steps correctly, then your Windows 10 will no longer download Windows updates automatically and your win update stop. So now you can save data when using a internet connection. But if someday you want to update your windows, you have to download and install it manually. You can do this through ‘Settings’ => ‘Update & Security’ => ‘Windows Update’.- Turn on your computer first, then make sure you are on the desktop
- Once you are on the desktop, then press the Windows key + R on the keyboard to open the Command Prompt.
- Then a dialog box will appear, Type ‘gpedit.msc’ and click OK to open the ‘Local Group Policy Editor’.
- Search for the following path:
- Once you are on the right path, pay attention to the right side. Look for the 'Configure Automatic Updates’ policy, then double click on it.
- Then a new box will appear, pay attention to the upper left side. There are several options such as ‘Not Configured’, ‘Enabled’, and ‘Disabled’. To turn off the windows update policy, check the ‘Disabled’ option.
- And then click the ‘Apply’ button in the bottom right side
- Then click ‘OK’ button.
Computer
Configuration\Administrative Templates\Windows Components\Windows Update
How to Configuring Automatic Windows Update Options
But if Blocking
Automatic Windows Updates Using Local Group Policy is not working, you can use
the Group Policy Editor to configure the Windows Update option. You can use the
Group Policy Editor to prevent Windows 10 updates from installing automatically
on your computer. Here's How To Configuring Automatic Windows Update Options:
- Turn on your PC first, then stay on the desktop screen
- Once you are on the desktop, press the Windows key + R button on the keyboard to open the Command Prompt.
- Then a new box will appear, Type ‘gpedit.msc’ and click OK to open the ‘Local Group Policy Editor’.
- And then browse for the following path:
- Once you are on the right path, pay attention to the right side. Look for the ' Configure Automatic Updates’ policy, then double click on it.
- Then a new box will appear, pay attention to the upper left side. There are several options such as ‘Not Configured’, ‘Enabled’, and ‘Disabled’. To turn on the windows update policy, check the ‘Enabled’ option. Then notice under the "Options" section, you will find several options for configuring automatic windows updates, including:
- 2 - Notify for downloads and install automatically.
- 3 - Automatic download and notify to install.
- 4 - Automatic download and schedule installation.
- 5 - Allow local admin to choose settings.
- After that click the ‘Apply’ button in the bottom right side
- Then click ‘OK’ button.
Computer
Configuration\Administrative Templates\Windows Components\Windows Update
After you
complete the above steps correctly, then your Windows 10 will no longer
download Windows updates automatically. So now you can save data when using a
internet connection. And if there is a new windows update available, you will
get the notification. And to install the windows update manually, you can go
through ‘Settings’ => ‘Update & Security’ => ‘Windows Update’.
If at any
time you want to change the windows update settings as before (default),
anytime you can revert the changes using the same steps as above. But look at
step No. 6, make sure to select the ‘Not Configured’ option. Then make sure to reboot
your device first to apply the changes to Windows updates.
How To Block Automatic Windows Updates Using Registry
I have never
tried this method myself using another edition other than Windows 10
Prefessional edition. But you can still try it on the Windows 10 besides the
professional edition, because basically all Windows 10 has the same system. Okay,
in the Windows 10 Professional edition, you can stop automatic windows updates
using the Registry. Here's How to Disable Windows 10 Update Registry:
Warning: As
a reminder, editing the Registry System is a fairly risky way, and it can cause
permanent damage to your Windows 10 installation if you don’t do it correctly.
Before doing this steps, you are strongly recommended to make a full backup of
your PC before proceeding. Just in case if something unexpected happens.
- Turn on your PC first, then stay on the desktop screen
- Once you are on the desktop, press the Windows key + R button on the keyboard to open the Command Prompt.
- Then a new box will appear, Type ‘regedit’ and click OK to open the ‘Registry’.
- And then browse for the following path:
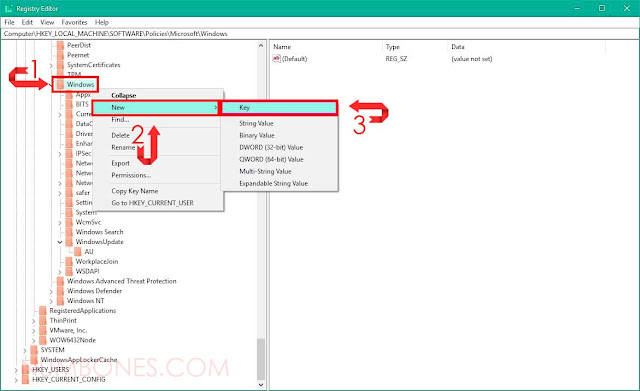
- Pay attention to the folder named ‘Windows’ on the left side. Then right click on the ‘Windows’ (folder), select ‘New’, then click ‘Key’
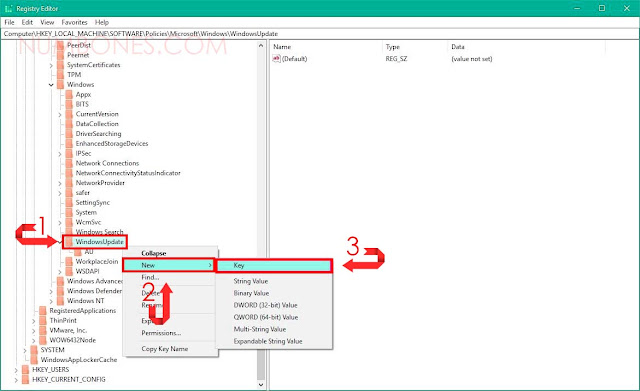
- Give a name of the key that we just created with ‘WindowsUpdate’, then press Enter, and a new folder will be appear named ‘WindowsUpdate’.
- In the key that named ‘WindowsUpdate’ (folder) that we just created, right-click on it, select ‘New’, then click ‘Key’.
- Give a name of the key we just created with ‘AU’, then press Enter, and a new folder will be appear named ‘AU’.
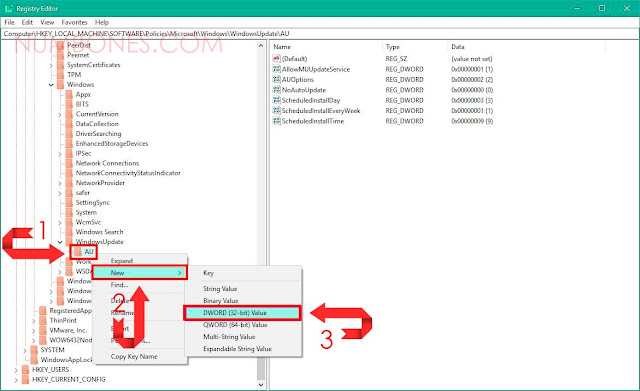
- In the key named ‘AU’ (folder) that we just created, right-click on it, select ‘New’, and click ‘DWORD (32-bit) Value’.
- Give a name of the key that we just created with ‘NoAutoUpdate’, then press Enter, and a new key will be appear named ‘NoAutoUpdate’ on the right side.
- Double-click on the newly created key named ‘NoAutoUpdate’, then change the value from 0 to 1. Then click ‘OK’ button.
HKEY_LOCAL_MACHINE\SOFTWARE\Policies\Microsoft\Windows


After you
complete the above steps correctly, then your Windows 10 will no longer
download Windows updates automatically. So now you can save data when using a
internet connection. But if someday you want to update your windows, you have
to download and install it manually. You can do this through ‘Settings’ => ‘Update
& Security’ => ‘Windows Update’.
How to Configuring Automatic Windows Update Options Using Registry
If Blocking
Automatic Windows Updates Using Registry is not working, you still can use the Registry
to configure the Windows Update option. You can use the Registry to prevent
Windows 10 updates from installing automatically on your computer. Here's How
To Configuring Automatic Windows Update Options Using Registry:
- Turn on your PC first, then stay on the desktop screen
- Once you are on the desktop, press the Windows key + R button on the keyboard to open the Command Prompt.
- Then a new box will appear, Type ‘regedit’ and click OK to open the ‘Registry’.
- And then browse for the following path:
- Pay attention to the folder named ‘Windows’ on the left side. Then right click on the ‘Windows’ (folder), select ‘New’, then click ‘Key’
- Give a name of the key that we just created with ‘WindowsUpdate’, then press Enter, and a new folder will be appear named ‘WindowsUpdate’.
- In the key that named ‘WindowsUpdate’ (folder) that we just created, right-click on it, select ‘New’, then click ‘Key’.
- Give a name of the key we just created with ‘AU’, then press Enter, and a new folder will be appear named ‘AU’.
- In the key named ‘AU’ (folder) that we just created, right-click on it, select ‘New’, and click ‘DWORD (32-bit) Value’.
- Give a name of the key that we just created with ‘AUOptions’, then press Enter, and a new key will be appear named ‘AUOptions’ on the right side.
- Double-click on the newly created key named ‘AUOptions’, then change it’s value using one of the following options below, choose according to the one that suits you:
- 2 = Notify for download and auto install.
- 3 = Auto download and notify for install.
- 4 = Auto download and schedule the install.
- 5 = Allow local admin to choose settings.
- Then click ‘OK’ button.

HKEY_LOCAL_MACHINE\SOFTWARE\Policies\Microsoft\Windows


After you
complete the above steps correctly, then your Windows 10 will no longer
download Windows updates automatically. So now you can save data when using a
internet connection. And if there is a new windows update available, you will
get the notification. And to install the windows update manually, you can go
through ‘Settings’ => ‘Update & Security’ => ‘Windows Update’.
If at any
time you want to change the windows update settings as before (default),
anytime you can revert the changes using the same steps as above. But look at
step No. 5, make sure to select the WindowsUpdate key (folder), and the right
click on it, then select ‘Delete’ option. Then make sure to restart your device
first to apply the changes to Windows updates.
Closing of How to Turn Off Windows Update in Windows 10
Although in
this article we show you how to stop windows updates on your computer, it is
important to make it clear that it is never recommended to skip the update.
Because Windows updates are very important to keep Windows 10 running correctly
and it can improve the performance of Windows to be even better.
But there
are some cases when you might need to apply Windows 10 updates manually,
schedule installation times for a certain time, or just because you want to
make sure that Windows 10 updates are functioning correctly before installing it
on your device.


0 Response to "4 Easy Way to Disable Automatic Windows Updates in Windows 10 Permanently"
Post a Comment
Feel free to ask.